Attachment metadata workbench
The Attachment metadata workbench allows you to easily add and edit metadata for attachments without opening each attachment in Specify. You can download a metadata spreadsheet for a batch of attachments, add missing metadata and/or edit existing metadata, then upload the metadata into MELISR. Note that you cannot use the Attachment metadata workbench to add new attachments to MELISR; they must have already been uploaded.
The URL for the Attachment metadata workbench is http://melisr.rbg.vic.gov.au/imagemetadata.
Downloading attachment metadata
To download metadata for a batch of attachments:
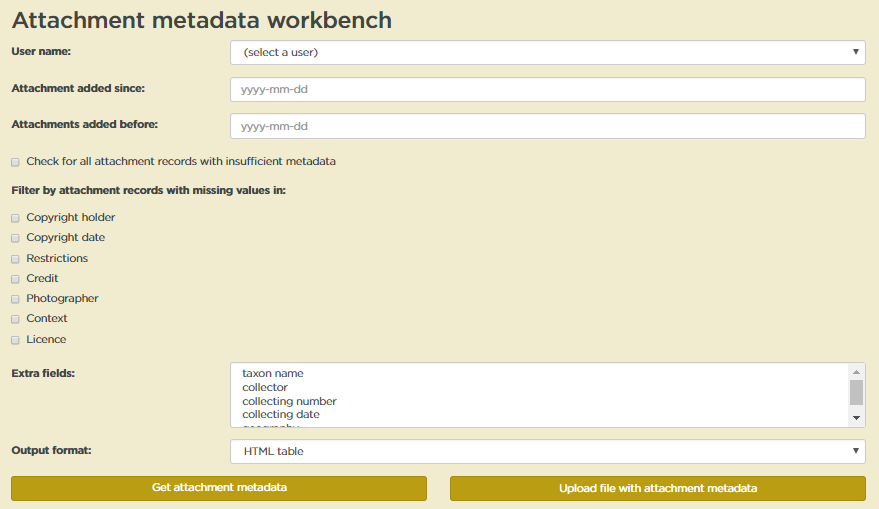
Select your Specify user name from the drop-down list
In the Attachments added since and Attachments added before fields, enter the date span in which the attachments requiring metadata were added to MELISR
You can limit your attachment records to those with insufficient metadata to be used for anything other than viewing in MELISR by ticking the Check for all attachment records with insufficient metadata box
Alternatively, you can limit your records to those missing certain pieces of metadata using the Filter by attachment records with missing values in option (selecting multiple fields will include records with no data in one or more of the fields selected)
You can include other fields from the specimen record in your metadata file for reference by selecting them in the Extra fields box. Hold the Ctrl key down to select more than one field. Note that these will all be ignored when the file is uploaded, so you can’t use the Attachment metadata workbench to edit data in these fields.
Select the Output format. HTML table will provide a preview of the results in your browser.
Click Get attachment metadata to download the metadata file.
Editing attachment metadata
To edit the metadata file:
Open the attachment metadata file from within Excel or another text editor; don’t open the file from the file manager. If you open the file from the file manager, any special characters (umlauts, accents etc.) will be corrupted in Excel.
If the file doesn’t appear in the file browser, check that it is looking for all files, not just Excel files:

In the Text Import Wizard, ensure that ‘Delimited’ is selected, and change the File origin to UTF-8 (this will preserve any special characters in the metadata):

Add or edit the metadata fields. Refer to the instructions for entering metadata in the Attachment (p. 102) and Additional metadata (p. 103) tables, and take careful note of the following:
You can change an attachment from a Collection object attachment to a Collecting event attachment (and vice versa) by changing the table name in the Table column. Make sure you spell the table name correctly, and use maximal capitals, i.e. ‘Collection Object’, ‘Collecting Event’.
Do not edit the GUID column as it is used to match the rows in the spreadsheet to records in the database
Data in the CatalogNumber, MimeType, AttachmentLocation, Title, Created and CreatedBy columns will be ignored when the file is uploaded, so those columns should not be edited
The Modified and ModifiedBy values will be automatically updated when the metadata is uploaded, so there’s no need to edit those columns
If you delete data from a field for an individual record, the value of that field will be cleared when the metadata file is uploaded.
Save the file once you’ve finished editing the metadata.
Uploading attachment metadata
To upload the edited metadata into MELISR:
On the Attachment metadata workbench page, click on Upload file with attachment metadata. This will open the Upload attachment metadata page.
Select your Specify user name from the drop-down list
Click on Choose file and navigate to the metadata file you wish to upload
Click Submit to load the file
- A record set will be created for the records in the upload file (if you’re already logged in to Specify when you upload the file, you’ll need to log out and back in before you can see the record set).